12.23.2007

Framed!!!


The basics for pretty much all the amenities are now framed in and ready to be built upon - this includes all plumbing (with a brilliantly designed tankless water heater) and in-wall electrical. I'm really proud of how compact I was able to keep the network of water, gas, drain and vent lines - all tucked neatly into the back corner of the bathroom with an access door that will likely be covered by a mirror. I've now begun to install the shower pan and Wonderboard concrete panels; I intend to simply put translucent corrugated fiberglas panels over the concrete panels for the shower walls. All walls framed with steel stud will also be sheathed with corrugated fiberglas panels. This wall covering is great in a situation like this as it allows light in and out while offering privacy. The halogen and rope light in the kitchen has gone up recently - the string of rope light will be tucked into the rafter to illuminate over the sink/stove area. Rope light will also be snaked through the rafters of the bathroom (including over the shower area) and also be covered in fiberglas panels, illuminating the entire ceiling.

12.12.2007

Hiatus

It's been a long time since I Rock-n-Rolled...Well, sort-of. Actually, it's 'Le Rock' that has kept me away from my loft, and consequently this blog, since shortly after my last post in late August. I was invited to go on tour in early Sept. and landed in late Nov. After settling back in and acclimating from post-tour stress disorder over the Thanksgiving weekend, I've been hard at work and will have a number of additions to exhibit on my next post. Until then, hold tight!

8.23.2007

Build that...um, those walls.


O.K., so it's been a bit since my last post. This is due in no small part to the fact that I finally moved out of my former flat. The move took a bit longer than normal because, as it turns out, my previous landlord allowed me to salvage nearly every amenity and fixture in the entire apartment. This includes the Kohler bathroom fixtures, the fridge and stove and kitchen cabinetry, among other items. Big help, indeed! The sizing of all these appliances works perfectly in my design that, as you can witness by the photos, is beginning to take shape. The framed areas will be the kitchen (left), the bathroom (right) and the loft area (above kitchen). In the walls exists all of the finish plumbing, gas lines and drain pipes that I completed this past week. It's really beginning to take shape, but working alone can be taxing at times, so today I took a break and accepted an invitation to lay low with a friend at the pool of the Hotel Figueroa in Downtown L.A. Tomorrow? ... exactly, back to work.

8.02.2007

Whoa!!!


Wow! From out of nowhere the major plumbing is done. A friend recommended his long time plumber Alex Lopez, and though he 's rarely in downtown Los Angeles, he happened to be in the area yesterday and offered to come have a look. He was extremely gracious and offered to move another obligation and come back downtown today and now, voila!, it's done. We core drilled three holes in the 9-1/2" concrete slab floor and installed plumbing for the toilet, shower drain and kitchen sink - which doubles as a bona-fide vent for all three fixtures. Smooth sailing for all that waste...what joy! Needles to say, my freshly minted floors took a beating, but that's only because I'm a knucklhead and decided to make ev'rything look purty before the rough work was done. A few touch-ups and we'll be back to exalting in no time. I've yet to place a large materials order, and now with this rough plumbing done, which has been the most ambigous cornerstone in this project, there is nothing holding me back from fervently moving forward.

7.28.2007

Shiny Happy


A nice, clean, shiny concrete floor to be trampled upon. What bliss.

7.26.2007

The Spray Booth

    
Ahh. Almost there. I finished spraying a second coat of acrylic hi-gloss sealer on the entire concrete floor. It's really gratifying to see all of the texture and color variations that were hidden for so many years come to life with this clear finish. I used an airless sprayer in conjunction with a 3/8" nap roller to even out the finish. The sealer was particularly powerful on the exposed red brick, which was endlessly dry, rough and crumbling. The acrylic clear coat was soaked up by the thirsty brick and grout and the walls are now sealed and water-proof. Now I'm on to sort the pluming drainage system. I expect to core two or three holes in the concrete floor and tie into the vertical sewer drain through the floor below. While doing this I am also finalizing the order for building materials, which I plan to have delivered all at one time.

7.24.2007

Scrub a Dub Dub...

    
Oh goody, concrete surface scrubbing! What fun!!!! Ok, it was a lot of work, but surely the end result is worth the effort. This floor has not been cleaned for many, many years and the newly exposed concrete is really impressive. I rented an industrial floor scrubber with a "concrete brush" for the task. I had three gigs and 2 rehearsals over the past weekend, but still found time to painstakingly scrub the floor. This, of course, was accomplished by NOT SLEEPING AT ALL! I caught up on sleep a bit last night and today taped off the kitchen and bath area and laid the first coat of light grey epoxy floor paint. I decided to coat the kitchen and bath area with a solid color for uniformity. After this painted area is dry, I'll be spraying a few coats of acrylic gloss sealer on the entire floor and exposed brick. The photo on the right is the first real glimpse of this brick, which I exposed by carefully chipping away the ailing stucco that once covered it under both of the casement window walls.

When I first started this blog, my dear friend Brando suggested I include photos of myself working on-site to give the blog a sense of human-ness. While I'm not crazy about action shots of myself working on a loft, I figured a still shot of an un-manned concrete floor scrubber would indeed be quite benign...so there I am, in all my flattering glory, conducting said floor scrubber. Hope this helps make my blog a bit more personable.

7.18.2007

Isle of White!

    
I've finally taken a break to make a new post. As you can see, the room is a bit brighter after a couple coats of white primer base coat. Two weeks may seem like a long stretch for a couple coats of primer, but it's the prep work you don't see that takes time. With the help of my new Makita cordless tools, including a 4-1/2" angle grinder (thanks guys!), I removed a number metal anchor bolts, conduit supports, etc. from the ceiling and did what seemed like endless patching on the ceiling, walls and support columns. One big obstacle was sealing the back wall (not shown) that had separated from the concrete pillars, floor and ceiling. There were gaps as big as 1" wide, some exposing daylight! I used strips of pink insulation as a barrier and then sealed off the gaps with Great Stuff expandable spray foam. There were also a number of gaps and cracks from the outside, in the hallway, that needed patching and sealing. It's a bloody old building that just simply hasn't been very well kept. I'm currently onto preparing the floor for a cleaning with a rotary scrubber and TSP (trisodium phosphate). The floor has a number of holes, presumably for anchoring heavy machinery from the room's past life. I've just begun filling these with a rapid set concrete mix. Once the the floor is prepped, I'll be diving into coating it with a high-gloss sealer or clear two part epoxy coat.

6.27.2007

The Good, the Bad and the Ugly...


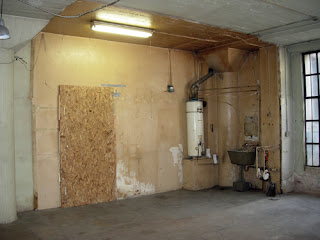
Wew! It's been a long week and a half since my last post. As promised, I've razed the storage room at the front end of the space, leaving for your visual stimulation a decrepit, but usable network of plumbing, an ancient sink and water heater, and an oh so beautiful aged "beech" paint color...Eeee! I really hope that it's not lead based paint. The chipboard (1/2" OSB) is covering what was the door to the former storage room. I've meticulously sealed all gaps and crevices with expandable foam spray before covering the inside and outside with OSB. In order to remove the old sink mounted to the outside of the storage room without cutting the water main, I cut around the hot and cold water lines, leaving, in my humble opinion, the first piece of art to come out of this room: A sort of Picasso face or a hot and cold Laurel and Hardy duo...In the coming days I will be sorting out the plumbing, reducing the existing pipe to the main water line with a master valve and a hose bibb. This will remain until I begin framing the walls to the kitchen and bathroom which will determine where the runs will go. I will also begin clearing out any redundant electrical conduit and sorting out how I will run the circuits. As you can see, the photo of the mains box is not a pretty site.I believe there is only one 35 amp circuit running into my room - I'll need three 20 amp circuits minimum. Once I've sorted out the plumbing and electrical basics, I intend to fll any holes and cracks in the walls and ceiling and spray a coat of white primer over the entire room. This will leave a clean slate on which to start the build-out.

6.15.2007

Countdown to ecstasy!

    
Well, finally got the keys today after a couple days of massive cleaning. The gracious and scholarly building manager, Mark Cornley, allowed me the keys a couple weeks before my lease downbeat. Until now, this unit has been an uninhabited storage space for the building owner's business. Needless to say, there was a lot of accumulation - both of random industrial items and, well...DUST! During the cleaning, i was able to procure a few useful items: including two barrels of wheels and casters - which will come in handy, as I wish to have much of my furniture, et. al. on wheels - and a table saw which will be invaluable during the build out. If you compare the above photos to that from my first post, you'll notice that it's beginning to feel a bit more like a spacious 1100 sq. ft. of loft space. The drab colors don't reflect the light well, so I expect the ambient light to increase markedly once the walls get a fresh coat and the concrete floor is treated with a wet-look sealer. By the time of my next post, I'll have razed a 7'x17' storage build-out at the far end of the loft. This area will become the Kitchen, Bath and loft areas. A water line and vertical sewer main that will serve these amenities run behind a wall in the corner of this storage space.

5.29.2007

Ground zero

    
Here we are! I've finally decided on a unit in a building in Downtown Los Angeles as the location for my new music production suite The Tin Room. It is so called because I intend to use a combination of corrugated tin and corrugated fiberglass panels for much of the wall materials - along with framing with steels studs and exposed electrical conduit. I've looked at a number of rooms in this building before committing to this suite, and while the others may have a better view of the skyline or more direct sunlight or the like, they all proved to have other undesirable qualities or insurmountable technical issues. This unit gets it's light from the building's interior light well. The windows get plenty of light and blue sky to boot and it stays cool. But perhaps the most important attribute is its' sound...or lack thereof. With the windows closed you can hear a pin drop. My acute case of tinnitus might even have a hard time in this space, but that's OK, because the microphones are going to love it! A view...? you can have it. I plan to be looking inside whilst working in this space, and that's the only view I'll need.